This is an example how to specify the way in which a unit may change its height:
   HeightChangeMethodNum = 3
   HeightChangeMethod0 {
      movecost = 25
      heightdelta = 1
      dist = 2
      startheight = ground_level
      canattack = false
   } HeightChangeMethod0
   HeightChangeMethod1 {
      movecost = 0
      heightdelta = 1
      dist = 0
      startheight = low_level_flight
      canattack = true
   } HeightChangeMethod1
   HeightChangeMethod2 {
      movecost = 10
      heightdelta = -2
      dist = 0
      startheight = medium_level_flight
      canattack = false
   } HeightChangeMethod2
This example shows a unit that can take off from ground to low_level_flight traveling 2 fields, then ascend further to medium_level_flight by raising on the field that it is standing on. From medium_level_flight it can land directly to ground_level.
HeightChangeMethodNum defaults to 0, so if you don't specify it, a unit will not be able to change its height.
One HeightChangeMethod can work from different levels of height:
   HeightChangeMethod0 {
      movecost = 15
      heightdelta = 1
      dist = 2
      startheight = ground_level medium_level_flight
      canattack = false
   } HeightChangeMethod0
It must not happen that there are several methods to change a units height in the same direction. The following example is NOT valid:
   HeightChangeMethod0 {
      movecost = 15
      heightdelta = 1
      dist = 2
      startheight = ground_level medium_level_flight
      canattack = false
   } HeightChangeMethod0
   HeightChangeMethod1 {
      movecost = 15
      heightdelta = 1
      dist = 0
      startheight = medium_level_flight
      canattack = false
   } HeightChangeMethod1
because the unit would have two HeightChangeMethods for ascending from medium_level_flight.
It is of course perfectly legal to have one method for ascending from medium_level_flight and another one for descending from medium_level_flight.
You should avoid giving a height change method a lower movecost than dist*10. If the unit could travel two fields by changing its height and use only 15 movement points, the path finding algorithm would travel by constantly changing the unit's height because that is the shortest way (shorter even than bee-line) to move from one field to another. There is one exception: if the unit is changing from one height where it is really slow to another where it is significantly faster, it can be ok. Just check out if the movement algorithm makes unnecessary height changes. If it does, increase the movement cost of the height change operation.
Last change: Wed, 2003-02-19 7:29
Since version 2.3.76.2 ASC supports the formal definition of Packages.
The package is defined in an .asctxt file.
Example:
package {
Name = MyPackage
Description = This is the package containing the MyCoolUnitset. Website: www.MyCool.stuff Version = 1.3
DependencyCount = 2
Dependency0 {
package = ASC
version = 2.3.75.2
} Dependency0
Dependency1 {
package = MyPackage
version = 1.3
} Dependency1
} package
A package has a version number, description and dependencies. This information is embedded in savegames and .ascpbm files and is checked when such a file is loaded.
If a package is missing on the computer where a .ascpbm file is opened, the package description will be displayed. That's why it is recommended to have an URL in the package description where to obtain the package.
The self-dependency (MyPackage depending on MyPackage) serves to ensure that the users opening an .ascpbm have a well defined version of the package. In this example, if a users tries to open an .ascpbm file but he has only MyPackage version 1.2 installed, he will be presented a message telling him to obtain version 1.3 of MyPackage.
ASC automatically detects which packages are used by a given map and only embedd them into files.
In order to detect which package the artifacts of a map belong to, it is essential that the package file is located in the same .ascdat file as the artifacts. Unlike other .asctxt files, it is not possible to have the package description in the asc directory as an independant file. It must be packaged into an .ascdat file!
ASC offers a menu entry Debug/show packages used by map with which you can check from which packages the artifacts on a map are from. This is the information that will be embedded in file when they are saved.
Last change: Sun, 2009-11-01 13:08
For many years, ASC has only supported a single language. The program itself was in English, while maps where either English or German.
With version 2.3.74.2 , ASC now supports internationalization for maps.
Identifying language
ASC uses the same system for naming languages as the LANG environment variable. en_US is US-English de_DE is german, and so on.
Translating Maps
Message events usually store their message directly in the event (so called 'Immediate Message Event'). This text is stored inside the .map file and then (while playing) inside the .sav file. Getting the .map or the .sav file is all you need to play that game.
The messages that are stored directly in the file have a given language. All map creators should specify the language that they type their messages in into the appropriate field of the Map Properties.
To translate a message, you first need to get hold of the message texts as raw text formats. Start the map editor, load the map, goto File/Preference and activate Save event message seperately. When you now save the map, a seperate file will be created.
The tut000.map has as default language de_DE . When saving, a file tut000.map.de_DE will be created, containing all the message.
If you now want to create an english translation, rename the file tut000.map.de_DE to tut000.map.en_US and translate its content. When you setup ASC to use the language en_US (either in game options or ASC detects that automatically) and you load tut000.map , ASC will look for tut000.map.en_US, find it and load the translated messages.
All further savegames of that map will now have the english messages, regardless if you switch to another language will playing this map.
Last change: Thu, 2013-06-13 18:50
Both units and buildings can produce units internally (that is, as cargo). Additionally, units can also construct units externally (that is, on a field next to the producing unit).
Internal production
   Features = Vehicle_Production
   Construction {
      VehiclesInternally = 1-3;7
   } Construction
This defines a factory with production lines for the VehicleTypes with id 1, 2, 3 and 7.
If you want to prevent the option to add or remove production lines of the factory, add NoProductionCustomization to Features.
The production cost is specified in the produced unit's definition. But the factory can modify the production cost by specifying a production efficiency:
   Features = Vehicle_Production
   Construction {
      VehiclesInternally = 1-3;7
      ProductionEfficiency = [ 1.5   0   0
                                 0 1.5   0
                                 0   0 1.5 ]
   } Construction
This example make production 50% more expansive in this factory.
If you want to produce inside a unit that doesn't have any energy supply, you can use this method to convert to different resources:
      ProductionEfficiency = [   0   0   2
                                 0   1   0
                                 0   0   1 ]
In this example, no energy is used for production, but for each energy unit specified as production cost, the factory will use 2 units of fuel.External production
   Features = construct_vehicles
   Construction {
      Vehicles = 17
   } Construction
Related things
You can add the Produce_Units_that_cannot_leave tag to the features of the factory, which results that you can produce units that will not be able to directly leave the factory. This allows for example an orbiting mothership to produce tanks, which can only be moved out by putting them into a landing craft.
Ammo_Production is another feature that is highly useful for factories, to avoid the hassle of manually supplying the newly produced units with ammo.
Last change: Thu, 2008-01-10 10:57
Many texts in ASC can be formatted, for example ingame-messages, unit description, messages from Events and many others.
The formatting is done by inserting tags into the text. The following tags are available:
- #fontsize=X#
- Sets the font size to X. Typical sizes are in the range 12 - 18
- #image=FILENAME.PNG#
- Inserts the image into the text
- #fontcolor=0xRRGGBB#
- Changes the font color to the specified value. RR / GG / BB are the red, green and blue component of the color in hexadecimal format (00 - FF). You can determine them with many HTML editors or graphic manipulation programs (like GIMP)
- #fontcolor=default#
- Resets the font color to the default one, which is defined in the ASC theme
- #indent=X,Y#
- Sets the indentation of lines. X is the amount of indentation for the first line of a paragraph, Y is the indentation for all remaining lines of a paragraph.
- #crt=X#
- Inserts a vertical space of X pixels
There are also some more tags being evaluated to render old legacy texts, so you may find them in existing texts, but since they should not be used for new one they are not listed here.
Last change: Sun, 2007-01-14 2:15
The abilities of units and buildings have been merged in ASC2. This means, that most functions are available both for units and buildings, unit can for example setup production lines and produce units, or do research!
ASC1 had the following ASCTXT entries:
- "Abilities" for VehicleTypes
- "Functions" for BuildingTypes
- "RequireUnitFunction" for Transportation
These can still be used for compatibility reasons, but to use the new features of ASC2, these entries must be removed and replaced by
- "Features" for VehicleTypes and BuildingTypes
- "RequiresUnitFeature" for Transportation
You can EITHER use the old tags ("Functions", "Abilities") or the new tags ("Features"), but you can't mix them!
Available tags are:
   "Training_Facility",
   "Vehicle_Production",
   "Ammo_Production",
   "Repair_Facility",
   "Recycling",
   "Research",
   "Sonar",
   "satelliteview",
   "mineview",
   "Wind_Power_Plant",
   "Solar_Power_Plant",
   "Matter_Converter",
   "Mining_Station",
   "Produce_Units_that_cannot_leave",
   "ResourceSink",
   "ExternalEnergyTransfer",
   "ExternalMaterialTransfer",
   "ExternalFuelTransfer",
   "ExternalAmmoTransfer",
   "ExternalRepair",
   "NoObjectChaining",  // only for buildings and has only optical effects. Prevents hidden buildings from being detected by looking at nearby roads / pipelines / ...
   "Selfdestruct_at_conquer",
   "paratrooper",
   "mine_layer",
   "cruiserlanding",
   "conquer_buildings",
   "move_after_attack",
   "construct_vehicles",
   "construct_specific_buildings",
   "icebreaker",
   "no_midair_refuel",
   "leaves_tracks",
   "automatic_resource_searching",
   "no_reactionfire",
   "self_repairing",
   "Kamikaze_only",
   "immune_to_mines",
   "jam_only_own_field",
   "MoveDuringReactionFire",
   "onlyTransMove" ,
   "AutoHarvestObjects",
   "NoProductionCustomization",
   "ManualSelfDestruct"
You can also check the definitive list of tags in the source code
Last change: Sun, 2008-01-06 5:41
TerrainTypes are defined through .ASCTXT files, just like most other data used in ASC. Here are two examples .ASCTXT terrain files.
Example1:
TerrainType {
   Name = SomeName
   ID = 12345
   Weather = dry
   dry {
      UseGFXpics = false
      Picture = filename.png
      DefenseBonus = 0
      AttackBonus = 0
      BasicJamming = 0
      MoveMalus = 11
      TerrainProperties = Lowland Track_possible
   } dry
} TerrainType
Example2:
TerrainType {
   Name = SomeName
   ID = 12346
   Weather = dry much_snow
   dry {
      UseGFXpics = false
      Picture = filename.png
      DefenseBonus = 0
      AttackBonus = 0
      BasicJamming = 0
      MoveMalus = 11
      TerrainProperties = Lowland Track_possible
   } dry
   much_snow {
      UseGFXpics = false
      Picture = filename_snow.png
      DefenseBonus = 0
      AttackBonus = 0
      BasicJamming = 0
      MoveMalus = 13
      TerrainProperties = Lowland Track_possible
   } much_snow
} TerrainType
Values for Weather:
Weather = { "dry",
        "light_rain",
        "heavy_rain",
        "few_snow",
        "much_snow",
        "snow_and_ice" };
Last change: Tue, 2005-02-08 11:54
Transparenzen mit Gimp 2.x
- Gimp starten ;-)
- Unter Menüpunkt Datei -> Öffnen laden wir uns zunächst das zu bearbeitende Bild. (0)
- Unter Menüpunkt Datei -> Neu ein neues Bild erstellen.
- Nun können wir die Größe des neuen Bildes auswählen. Es sollte am besten
die gleiche Größe wie das Originalbild haben.
Falls wir die genaue Größe des Originalbildes nicht wissen können wir mit der rechten Maustaste im Originalbild über Bild -> Skalieren uns die Größe in Pixel nochmal genau anschauen.(1)
Zusätzlich können wir hier die Hintergrundfarbe des neuen Bildes festlegen. Entweder die aktuell definierte Vordergrundfarbe, Hintergrundfarbe, weiss oder aber transparent. Wir wählen 'transparent' aus. (2) - Jetzt geht's zurück ins Originalbild welches geöffnet wurde.
Unser nächster Schritt wäre es einen bestimmten Teil des Bildes mit einem Transparenzwert auszustatten Im Hauptfenster von GIMP sehen wir ganz oben links mehrere Icons. Ein Rechteck, einen Kreis, ein Lasso und einen Stab. Wir wählen nun den Stab (auch Zauberstab genannt - warum werden wir gleich sehen) und klicken auf den zu mrkierenden Teil des Bildes mit der linken Maustaste und halten die Maustaste gedrückt. GIMP markiert nun ähnliche Farbbereiche wie unser angeklicktes Pixel mit einer Umrandung. Wenn wir nun mit gedrückter Maustaste den Mauspfeil nach links oder rechts langsam bewegen wird uns auffallen, dass GIMP selbstständig den markierten Bereich entweder verkleinert oder vergrößert. Wenn der Bereich die Form besitzt welche wir uns wünschen lassen wir die Maustaste wieder los.(3)Sollten noch zusätzliche Pixel zu Auswahl hinzukommen, kann man mit das Werkzeug 'Lasso' auswählen und durch gleichzeitig gedrückter SHIFT-Taste und linker Maustaste noch weitere Pixelbereiche zu unserer vorhergehenden Stab-Auswahl hinzufügen.
Gerade bei solchen kleinen Bildern ist der Stab oftmals etwas unpassend. Hier ist wäre es besser gleich von Beginn der Markierung an mit den Lasso zu arbeiten.(4)
Tipp: Sollte alles etwas klein aussehen und Sie schon fast mit der Nase am Bildschirm kleben:
In der Werkzeugleiste des Hauptfensters gibt es eine Lupe hiermit kann durch einfaches klicken ins Bild die Ansicht vergrößert werden. Es kann auch ein rechteckiger Rahmen gezogen werden, so dass noch ein bestimmter Teil zu sehen ist. - Wir haben jetzt einen Bereich markiert. Nun nutzen wir per rechter Maustaste den Befehl Bearbeiten -> Ausschneiden
- Wir haben jetzt einen Teil des Bildes uns geholt.
Nun geht's rein in unser noch leeres neues Bild.
Mit der echten Maustaste Bearbeiten -> Einfügen erhalten wir eine neue eingefügte Auswahl. Mit Ebene -> Neue Ebene ... verändert sich unsere eingefügte Auswahl in eine eigenständige Ebene. (6) - Was können wir jetzt mit dieser Ebene anstellen?
Wir können ihr Transparenz geben! :-)
Das ganze läuft über einen Prozentwert im Dialog Ebenen, Kanäle. Sollte eigentlich eingeblendet sein, wenn nicht kann er mit der rechten Maustaste Dialog -> Ebenen hervorgeholt werden.
Die Transparenz bezieht sich immer ebenenbezogen. D.h. jede Ebene besitzt Ihre eigene Transparenz. (7) - Wir gehen jetzt zurück in unser Originalbild, wo beireits ein Teil fehlt. Wir können uns jetzt wie unter Punkt 5 beschrieben uns den nächsten Teil des Bildes holen welcher die gleiche Transparenz aufweisen soll. Somit setzen wir unseren ORXIS-Panzer Stück für Stück wieder zusammen. Jetzt jedoch etwas durchscheinend.
- Wenn alles beendet ist, aber wir nun ein Bild mit unterschiedlichen Transparenzen in mehreren Ebenen. (8)
- Nun müssen wir über Datei -> Speichern unter ... das fertige Bild nur noch sichern.
- Mehr gibt es eigentlich nicht zu sagen. Der ORXIS-Panzer besitzt jetzt eine Transparenz welche im folgenden Bild sehr
gut zu erkennen ist.
Naja, man erkennt es nicht unbedingt sehr gut. Man sollte sich mit dem Ausschneiden und Transparenz anpassen vielleicht etwas mehr Zeit lassen. ;-)alt 
neu 
- Quellen:
- ORXIS Panzer
Die Dateierweiterung muss hier unbedingt .png lauten (9). Auf diesem Wege werden die Transparenzen mit gespeichert. Der nachfolgende Dialog zeigt noch Informationen über Kompression u.ä. die uns jetzt aber mal nicht interessieren sollten.
Last change: Sun, 2005-01-23 8:30
The graphical user interface (GUI) of ASC consists of two kinds of objects: windows and panels.
A window has exclusive control over the input devices, while a Panel can be open while the player plays on the map.
Panels
The panels are composed of widgets, which are defined in .ascgui files. These files have the syntax of .asctxt files, but don't support the kind of inheritance used for example for vehicle types. Their content is also not cached, but parsed every time a panel is opened, which allows to edit the .ascgui files in a running ASC session and see the results by closing and reopening the panel.
ascgui { height = 550 width = 170
ChildWidgets = MyDisplay TheOutput ; you can give any names heres, important is only that they are detailed below
MyDisplay { x = 10 y = 10 width = 20 height = 40 x2 = 30 y2 = 50 type = SomeType name = PARENT ChildWidgets = SubWidget SubWidget { x = 10 y = 10 type = TYPE name = CHILD } SubWidget } MyDisplay TheOutput { x = 10 y = 10 width = 20 height = 40 x2 = 30 y2 = 50 type = TYPE name = FooBar ToolTipHelp = HelpMessage } TheOutput
} ascgui
As you can see, Widgets can be nested arbitrarily. The widget CHILD inherits its properties from PARENT. A child can not be larger than the parent on the screen, it's not possible to make a widget that overlaps the border of its parent.
General Widget Properties
- type
- Possible values: "image", "area", "statictext", "textoutput", "bargraph", "specialDisplay", "specialInput", "dummy", "multilinetext", "scrollarea", "button", "radiobutton", "checkbox", "lineedit", "slider", "plain", "listbox"
- x, y, width, height, x2, y2
- Specifies the size of the widget relative to the parent widget. X and Y are mandatory and define the upper left corner of the widget. You can then either use width or x2, and either height or y2. With x2/y2 you define the lower right corner.
If X, Y, X2 or Y2 are negative, the position is calculated from the right side of the parent widget. Example: parent has a width of 100 and you specify x = -30 ; width = 20, then the left border is at 70 and the right border at 90. Which is exactly the same as x = -30 ; x2 = -10 or x = 70 ; x2 = 90
If Width or Height are not specified, the right and lower border of the widget will be the same as the parent widget.
- ToolTipHelp
- The message that will be be shown when the mouse hovers over the widget
The following properties are inherited through all widgets. If a property is not specified, the property's value of the widget's parent is used. Because of this inheritance, you often don't need to specify properties at all for a widget.
- BackgroundImage
- Filename of the background image. The image should have 24 bit color depth. PNG file format recommended. (Note: seamless backgrounds can easily be made with GIMP: filters -> map -> make seamless). Use empty string to disable background image: BackgroundImage =
- BackgroundMode
- Display mode of the background image. Possible values are: tile, stretch, tile3h, tile3v, tile9
- TextAlign
- Possible values: LEFT, CENTER, RIGHT
- FontColor
- Specifies the font color. Order of colors: RGB. Examples: 0xff0000 is pure red; 0 is black
- FontName
- Don't use this entry unless you know exactly what you are doing. And in that case you wouldn't need this documentation :-)
- FontAlpha
- 0 = invisible, 255 = fully visible
- FontSize
- The size of the fonts
- BackgroundColor
- Specifies the background color, syntax just like FontColor. Is only evaluated if backgroundImage is empty ("backgroundimage = ")
- Transparency
- Specifies the transparency of the whole widget. 0 = opaque / 255 = fully transparent (this is opposite from FontAlpha!)
Widget Types
Image
- FileName
- The filename of the image. See BackgroundImage
- Mode
- See BackgroundMode
StaticText
Displays text which is defined right in the .ascgui file.- Text
- The text of the label
- Style
- The given Paragui-Style will be used for the widget. This overrides all user specified parameters like background color or font size. Style is NOT derived to child widgets.
TextOutput
Displays text which will be provided by ASC. This widget is only useful together with appropriate program code inside ASC.- Name
- A name for identifying the widget from the program code to write. All Names must be unique in each panel.
- Style
- The given Paragui-Style will be used for the widget. This overrides all user specified parameters like background color or font size. Style is NOT derived to child widgets.
BarGraph
Similar to an Area, but its fill ranges from 0% to 100% from left to right. This widget is only useful together with appropriate program code inside ASC.- Name
- A name for identifying the widget from the program code to write. All Names must be unique in each panel.
- Direction
- Possible values: left2right, right2left, top2buttom, buttom2top. Default is left2right.
You can define different colors for different ranges:
           colors= 3
           color0 {
             color = 0x009c00
             fraction = 1
           } color0
           color1 {
             color = 0xfff000
             fraction = 0.3
           } color1
           color2 {
             color = 0xd6000f
             fraction = 0.1
           } color2
SpecialDisplay
This widget is only useful together with appropriate program code inside ASC. It is used to display non-standard things like the small map or the wind direction arrow.- Name
- A name for identifying the widget from the program code to write. All Names must be unique in each panel.
Area
Displays rectangular border in 3D style- in
- true / false ; determines whether the 3D effect is embossed (area lower than surroundings) or elevated (area higher than surroundings)
ListBox
Displays box where the user can select items from a list. The items can not be specified in the .ascgui file, but can only be provided programmatically by ASC
SpecialInput
This widget is only useful together with appropriate program code inside ASC. A SpecialInput widget is used to start actions when the user clicks on it. Since this widget itself is invisible, it must be used together with some visible widget.
- Name
- A name for identifying the widget from the program code to write. All Names must be unique in each panel.
Dummy
This widget does nothing and is used to structure other widgets. Example (also demonstrates unnamed widgets by specifying "widgetNum = 3" instead of "childWidgets = Name1 Name2 Name3"):
   widget0 {
      x = 10
      y = 10
      width = 20
      height = 44
      type = Dummy      FontColor = 0xffffff
      textalign = CENTER
      FontSize = 7
      widgetNum = 3
      widget0 {
	 x = 0
	 y = 0
         height = 15
	 type = TextOutput
	 name = WeaponPunch0
      } widget0
      widget1 {
	 x = 0
	 y = 15
         height = 15
	 type = TextOutput
	 name = WeaponPunch1
      } widget1
      widget2 {
	 x = 0
	 y = 30
         height = 15
	 type = TextOutput
	 name = WeaponPunch2
      } widget2

   } widget0
By using the Dummy widget, you can group the 3 TextOutput widgets. You can now change their font settings with a single entry. And since the coordinate are relative, you can move the whole column around and change their width by just changing the coordinates of the dummy widget.
MultiLineText
Displays a bigger amount of text. If the text doesn't fit into the widgets, a vertical scrollbar will be displayed for scrolling the text.- Name
- A name for identifying the widget from the program code to write. All Names must be unique in each panel.
- Style
- The given Paragui-Style will be used for the widget. This overrides all user specified parameters like background color or font size. Style is NOT derived to child widgets.
ScrollArea
Represents a area in which other widgets can be placed. If the widget coordinates don't fit into ScrollArea, ScrollBars are displayed for scrolling in ScrollArea.Button
A simple button which can be pushed- Text
- The text on the Button
RadioButton
A RadioButton which can be selected or not. All RadioButtons of a parent widget act as a RadioButton group, so that only one of the RadioButtons can be selected at one. If you want more than one RadioButton group, put them into different dummy widgets.- Text
- The text at the RadioButton
CheckBox
A simple checkbox.- Text
- The text on the Button
LineEdit
A single-line text input field- Text
- The default text (optional)
Slider
A simple button which can be pushed- Orientation
- Possible values: "vertical", "horizontal"
Plain
A simple, uniformly colored area
General Advice
- Do NOT include text in any pictures, rather use the StaticText widget for displaying text. This allows for a future translation of ASC into other languages
- Try to keep the graphics atomic. For example don't make an image of a whole dialog that already has the location of text entry fields. That would make later enhancements (for example adding a new text output field) or adjustments of the dialogs very difficult. Rather use a generic backgroud texture and position the individual elements on it inside the ASCGUI text file
Last change: Mon, 2009-06-01 10:44
The following building functions are available:
- HeadQuarters
- No function, this flag is currently not evaluated
- Training_Facility
- Can train units. Depending on map parameter this is either a training of stored units, or providing experience points to all newly produced units
- Vehicle_Production
- This building can produce units
- Ammo_Production
- This building can produce ammuntion
- Repair_Facility
- This building can repair units
- Recycling
- This building can recycle units. Note that all buildings can scrap units, a Recycling Plant just has a significantly higher resource output
- Research
- This building is a research facility. Note that other buildings can also produce research points, but only a research facility has an adjustable output
- Sonar
- This building can see submerged submarines
- Wind_Power_Plant
- The resource output of this building is dependend on the current wind speed (this is not restricted to energy!)
- Solar_Power_Plant
- The resource output of this building is dependend on the current weather(this is not restricted to energy!)
- Matter_Converter
- This building can convert different resources into each other. Examples are atomic power plants (make energy from material), conventional power plant (makes energy from fuel). Just specify a positive resource_plus for some and a negative for other resource types.
- Mining_Station
- This building extracts resources from the ground. Please not that a Mining Station can either extract material OR fuel, but not both.
- External_loading
- This building can refuel units standing next to its entrance. This flag is deprecated, use ExternalResourceTransfer and ExternalAmmoTransfer instead.
- Produce_Units_that_cannot_leave
- A normal production plant can only produce units that can leave the building through its door. A building having this flag can produce ANY units.
- ResourceSink
- This building consumes resources without the player being able to do anything againt it.
- ExternalResourceTransfer
- This building can refuel resources to units standing next to its entrance.
- ExternalAmmoTransfer
- This building can equip units standing next to its entrance with ammunition.
- NoObjectChaining
- Usually objects such as roads, pipelines and railways connect to a building. This flag disables this, making camouflaged buildings possible.
- Selfdestruct_at_conquer
- If an enemy unit conquers this building, it will self destruct.
- satelliteview
- This building can see satellites
Last change: Sun, 2004-12-05 13:57
When creating your own units graphics the file graphic templates/hexfield.pcx should be used as a template, for buildings graphic templates/building_raster.pcx. These files are located in the editor package of ASC.
The unit should fit into the hexagon. ASC will not crash if the unit is larger, but you might get ugly graphical artifacts and the units will overlap.
32 Bit graphics
32 bit graphics in PNG format with 8 bit alpha channel is the recommended graphics format for ASC2 and later.
For changing the colors of units and buildings, the following colors are reserved (R/G/B):
1/0/0
2/0/0
:
:
255/0/0
255/1/1
255/2/2
:
:
255/254/254
These pure red colors will be exchanged to the colors of the owner of a building or unit. If you need a red that is not changed, just increase the blue or greed component by one, which is nearly indistinguishable from the original color.
8 Bit graphics
The colors 16 - 23 (red colortone) will be shifted depending on the player who owns the vehicle. For the second player these colors will be shifted to 24 - 31 and so on. The color #255 is transparent so fill the remaining hexagon with this color when finished.
Last change: Sat, 2006-12-09 5:51
Importieren von Battle-Isle-Karten über Karteneditor
Voraussetzungen:
Zuerst sollte gesichert sein, daß folgende Dateien in einem durch die ascrc (zu finden in ~/.asc) vorgegebenen Suchverzeichnis stehen. Im Folgenden wird davon ausgegangen, daß alle diese Dateien direkt in ~/.asc vorhanden sind.
Natürlich sollte auch darauf geachtet werden, daß sowohl ASC wie auch der Karteneditor in der neuesten Version gehalten sind, ggf. können einzelne Dateien hier aktualisiert werden.
Weiterhin sollte darauf geachtet werden, daß der Karteneditor tatsächlich aus diesem Verzeichnis (~/.asc) heraus gestartet wird, da sonst in manchen Fällen die zum Import nötigen Verzeichnisse/Dateien nicht gefunden werden.
Typische Fehlermeldung in diesem Fall:
"A fatal error occured while accessing the file bla/blubbxyz.dat", gefolgt von einem
| Fatal signal: Segmentation Fault (SDL Parachute Deployed)
| Speicherzugriffsfehler
Natürlich sollte, da die Karten gezippt geliefert werden, auch unzip (>=5.41), ark oä. vorhanden sein.
Weiterhin sind noch folgende Dateien vonnöten (Erhältlich bei Battle Planet: aktuelle ASC-Dateien):
bi_set.con (Hauptcontainer),
bi-gfx (normale BI-Grafiken),
bi-alternate.gfx (alternative BI-Grafiken - sind auch nicht schlecht).
Diese Dateien nach ~/.asc kopieren. Anschließend soviele BI-Karten besorgen, wie man will; die Zip-Archive ebenfalls nach ~/.asc kopieren und dort entpacken.
Anschließend sollten folgende Verzeichnisse entstehen: .asc/eng, .asc/ger, .asc/mis und .asc/meta. Es können durchaus mehrere Archive nacheinander entpackt werden; die Inhalte dieser Verzeichnisse bleiben erhalten und kommen sich nicht gegenseitig in's Gehege.
Sodann den Karteneditor starten, Menü erscheint bei Druck auf [Alt] oder durch Berühren des oberen Randes mit der Maus - eine gewisse Wartezeit, bis eine Leerkarte erscheint, ist normal.
[File] sowie [Import BI-Map] auswählen. Anschließend sollten eine oder mehrere BI-Karten zur Auswahl stehen; [missxyz.dat] wählen.
Es sollten dann Übersetzungstabellen angezeigt werden; eine davon (mehrere Versuche können nicht schaden!) auswählen.
Möglicherweise wird dann eine Warnmeldung a la "The buildings/following objects on position... could not be found" kommen; diese ist dadurch verursacht, daß nicht immer alle BI-Objekte automatisch übersetzt werden können. Erstmal ignorieren.
Sicherlich wird die dann angezeigte Karte mit schwarzen 'Löchern' verunziert sein, diese lassen sich gewöhnlich durch Anwahl der Menüpunkte [Options][select graphics set] automatisch einflicken. Je nach Geschmack sollte dann [bi-gfx] oder [bi-alternate.gfx] gewählt werden.
Karte dann mit [File][Save map as] abspeichern; ASC sollte sie dann im Kartenladedialog anzeigen und öffnen.
Im Extremfall müssen/können fehlende Objekte (siehe 'objects... could not be found') hinterher von Hand eingepflegt werden. Die Karten sind aber gewöhnlich auch so sehr gut spielbar, da meistens nur sehr exotische Objekte a la Superspezialgeheimdepots nicht gefunden werden.
Außerdem ist es ratsam, die Produktion der Fabriken/Häfen/etc zu überprüfen, ob alle Einheiten richtig erkannt wurden. Sollte eine der Einheiten schwarz dargestellt werden, einfach löschen und erneut setzen ([F1] für Tastenkürzel bzw. Rechtstipp mit der Maus).
Einer Kontrolle bedürfen jedenfalls sämtliche Flughäfen, da Landebahnen in BattleIsle reine Dekoration sind, in ASC hingegen zwingend notwendig zum Starten und Landen der Flugzeuge. Deshalb an jedem Flughafen kontrollieren, ob eine ausreichend lange Landebahn vorhanden ist. Die meisten Flieger kommen mit 4 Feldern aus, schwere Bomber brauchen 5 Felder Landebahn. Die genaue Zahl für jeden Flugzeugtyp findet sich in der Einheitendokumentation unter Movement / Height Change Method / Distance , zu diesem Wert muss 1 Feld als Startfeld hinzugefügt werden.
Viel Spaß!
Bemerkungen:
1. Wenn man die BI-Ausgangskarten nicht hinter ~/.asc haben will, kann man sie auch woandershin entpacken; allerdings müssen dann die oben angegebenen Verzeichnisse durch symbolische Links auf den tatsächlichen Ort ersetzt werden.
2. Im Prinzip sollte, von der anderen Verzeichnisstruktur abgesehen, diese Anleitung auch für Windoze brauchbar sein.
3. Die installierten Versionen können mit 'asc --version' bzw. 'asc-mapedit --version' ermittelt werden. Wenn man wissen will, wo ASC und der Karteneditor liegen: 'which asc' bzw. 'which asc_mapedit' ausführen.
4. Der Editor asc_mapedit sollte nach gelungener Installation eigentlich im Pfad liegen. Wenn dem nicht so ist (außer: $PATH wurde absichtlich geändert), deutet das gewöhnlich auf ein fehlgegangenes 'make/make install' hin. Es kann bei ./configure auch die Option --prefix=/hier/dort/sonstwo eingesetzt werden, um auf nicht standardisierten Systemen einen Installationsort zu erzwingen (Default für Binaries: /usr/local/bin). Sollte der Karteneditor gesucht werden müssen: 'locate asc_mapedit' benutzen; wenn das locate-Paket nicht installiert ist, findet ihn auch 'find / -name "asc_mapedit" 2>/dev/null' (find wird fleißig auf der Platte schrubben - nicht wundern). Sollte die locate-Datenbank nichts finden (bei frischer Installation), kann sie mit 'updatedb' aktualisiert weden (verlangt root/sudo-Rechte)
5. Bei Bedarf können dem Karteneditor auch Optionen per Kommanozeile übergeben werden. 'asc_mapedit --help' liefert weitere Angaben.
6. Nicht alle BI-Objekttypen sind nach ASC übertragen; es kann durchaus sein, daß manche Objekt-IDs nicht zu finden sind (speziell bei BI3-Karten). In diesem Fall möglichst ähnliche mit bekannter ID einsetzen. Wenn jemand solche fehlenden Objekte erstellen will, wäre das willkommen:).
7. Ein Tutorial, wie Objekte ermittelt und eingesetzt werden, wird bald folgen. Bis dahin bitten wir um Geduld - der Tugend der Weisen.
8. Viele Funktionen des Editors können nur per Tastatur angesprochen werden.
Last change: Fri, 2003-09-19 5:38
A field has a number of terrain properties. See the source for a list of all properties. The terrain properties of a field are the properties of the terraintype and all objects on that field.
A unit / building / object has 4 variables for specifying when the field is accessible and when not:
- terrain_any
- to access the field, at least one of the properties listed here must exist here. If not a single property is listed here, absolutely no field will be accessible.
- terrain_all
- All properties listed here must be found at the field. If no property is listed here, it doesn't matter.
- terrain_not
- If at least one of the properties listed here is present on the field, that field can NOT be accessed.
- terrain_kill
- If a unit can not access a field, but it nevertheless is standing there, and one of the properties listed here is present on the field, the unit is killed.
An example: A tank is killed by deep water. But if there is a bridge over the water, there is the road property and the deep_water property on the field. Because the tank has road among the terrain_any, it can savely move across the field.
If the same tank is standing on a frozen lake and the ice is sudenly melting, there's only the deep_water property left. Now the field is not accessible any more, so the terrain_kill variable comes into action and finds the deep_water property. The tank is killed.
Last change: Wed, 2003-04-02 12:45
The syntax of ASCTXT files is documented in Article 33.
ASCTXT files support inheritance:
vehicletype {
  name = tank
  ID = 10
  armor = 500
  view = 40
  jamming = 5
  ...
} vehicletypevehicletype {
  name = heavy tank
  ID = 11
  parent = 10
  armor = 650
} vehicletype
This defines two units, a "tank" (which must have all definitions that are required for a vehicletype, indicated by the dots), and a "heavy tank" which is derived from "tank". The "heavy tank" inherits all properties of its parent unit except Name, ID, and Armor.
Modifying properties
Properties can not only be replaced, they can be modified too:
vehicletype {
  name = super heavy tank
  ID = 12
  parent = 10
  armor += 220
} vehicletype
The "super heavy tank" will have an armor of 720. Another operator is *= which multiplies a variable:
vehicletype {
  name = mega tank
  ID = 13
  parent = 12
  armor *= 1.2
} vehicletype
The "mega tank" inherits from "super heavy tank" and has 1.2 times the armor, which is 864.
Abstract parents
vehicletype {
name = A1
ID = 20
view = 10
abstract = true
} vehicletypevehicletype {
name = aircraft carrier
ID = 21
parent = 20
view *= 3
...
} vehicletype
vehicletype {
name = battleship
ID = 22
parent = 20
view *= 4
...
} vehicletype
You will never find the unit A1 in ASC nor the mapeditor, because A1 is NOT a unit. It is an abstract base class which only provides data to derived units. If you derive all ships from A1, you can easily modify the view of all ships just by modifying A1. If you decide after some testing that your ships should have a 10% increase in view, just modify A1 to have a view of 11.
Multiple inheritance
vehicletype {
name = trooper
ID = 30
view = 20
...
} vehicletypevehicletype {
name = binocular package
ID = 31
abstract = true
view = 100
} vehicletype
vehicletype {
name = reconnaissance trooper
ID = 32
parent = 31 30
} vehicletype
The "reconnaissance trooper" inherits from two base classes. The first one has precedence over the second one. This results in the "reconnaissance trooper" having all properties of the basic trooper except view, which is defined in the "binocular package".
Defining alias
TerrainType {
   dry {
      Picture = grass.pcx
      ...
   } dry
   much_snow {
      Picture = snow.pcx
      ...
   } much_snow
   snow_and_ice {
      Picture -> TerrainType.much_snow.picture
      ...
   }
   ...
} TerrainType
This terrain will use the same picture for snow_and_ice as for much_snow. It is necessary that you specify the fully qualified property name, include the TerrainType. prefix !
The alias can reference ANY property:
TerrainType {
   grass_image = grass.pcx
   water_image = water.pcx
   mud_image = mud1.pcx
   another_mud_image = mud2.pcx
   snow_image = snow.pcx
   abstract = true
   id = 100
} TerrainType TerrainType {
   parent = 100
   dry {
      Picture -> TerrainType.grass_image
      ...
   } dry
   much_snow {
      Picture -> TerrainType.snow_image
      ...
   } much_snow
   snow_and_ice {
      Picture -> TerrainType.snow_image
      ...
   }
   ...
} TerrainType
The alias-all operator
While the alias operator -> operates only on a single property, the alias-all operator ->* operates on a group of properties:
TerrainType {
   dry {
      Picture = grass.pcx
      ...
   } dry
   much_snow {
      Picture = snow.pcx
      movemalus = 15
      TerrainProperties = deep_snow track_possible
      ...
   } much_snow
   snow_and_ice ->* TerrainType.much_snow
   ...
} TerrainType
This all properties of the much_snow group will be copied into the snow_and_ice group.
Existing properties will not be replaced, as is shown in this example:
vehicletype {
  name = weapon definitions
  ID = 100
  abstract = true
  big_ground_to_ground_missile {
      Type = ground_missile shootable
      shotFrom = ground_level
      MaxRange = 42
      MinRange = 18
      Punch@MaxRange = 60
      Punch@MinRange = 70
      ...
  } ground_to_ground_missile
  small_ground_to_ground_missile {
      Type = ground_missile shootable
      shotFrom = ground_level
      MaxRange = 10
      MinRange = 10
      Punch@MaxRange = 40
      Punch@MinRange = 50
      ...
  } small_ground_to_ground_missile
} vehicletypevehicletype {
   parent = 100
   Weapons {
      Number = 2
      Weapon0 ->* VehicleType.big_ground_to_ground_missile
      Weapon1 ->* VehicleType.small_ground_to_ground_missile
      Weapon1.MaxRange = 20
   } Weapons
   ...
} vehicletype
This unit has two weapon systems. The first one has all properties of the big_ground_to_ground_missile defined in the abstract weapon definition. The second one is based on the small_ground_to_ground_missile , but uses a different MaxRange: 20 instead of 10.
Last change: Tue, 2003-04-01 9:37
You can group several vehicles together to form a unitset. In the mapeditor, you can enable and disable unitsets to make the selection of units easier. You can also define transformations that replace all units on a map by others. This is useful if you want to play a map with a different unit set than the one that is originally used by the map.
To define a unit set, you must create a unitset definition file, which is a plain text file with the extension .set . I suggest that you put all vehicles together with this unitset definition file into a single data container.
Here is an example for a unitset definition file:
#V2#
NAME=Standard Unitset
ID=0-800,900,920-930,950
BUILDINGID=0-400,507
MAINTAINER=Martin Bickel (martin@asc-hq.org)
INFORMATION=This unitset is part of the standard ASC data package which can be obtained from http://www.asc-hq.org
IDENTIFICATION=2
TRANSFORMATION=Example transformation;24,1840;25,1872;26,1805;27,1839;28,1878;29,1845;30,1834;31,1859;32,1821;33,1862;34,1810
TRANSFORMATION=Another transformation;77,1877;78,1878;79,1879;1000,1822;1001,1829;1002,1806
The first line must always be #V2#. This is to tell ASC that this is the second revision of the unitset definition file format. It is still possible to use the files with the old format, but if you create a new one use this new format.
Each of the following lines starts with a keyword, which must be UPPERCASE, an equals sign and some data. The order in which the properties are defined is not relevant.
- NAME
- The name of the unitset. It should not be longer than maybe 15 Characters.This field is required.
- ID
- The IDs of the units that form the unitset. This field is required.
- BUILDINGID
- The IDs of the building that belong o the unitset. This field is optional.
- MAINTAINER
- Some information about the person who maintains the unitset. This field is optional.
- INFORMATION
- Some information about the unitset. The internet address where new versions can be optained is useful here. This field is optional.
- IDENTIFICATION
- This is a numerical ID that is used by the WeaponGuide program to identify a unit set. The ID should be unique and therefore it should be part of the ID space of the unit set. This field is optional.
- TRANSFORMATION
- The field consists of the transformations name, a semicolon ( ; ) and a list of pairs of IDs. The first number is the ID of the unittype that will be replaced by the unittype with the second ID when this transformation is executed. In the above example, all units with ID 24 are replaced by units with ID 1840, all units with ID 25 are replaced by units with ID 1872, etc. You may define any number of transformations. Each transformation must be in a single line. These fields are optional.
Last change: Mon, 2004-08-02 14:46
A unit has three events which play sounds: movement, firing weapon and destruction. ASC has two methods for specifying these unit sounds.
Individual Sounds
Here is an example of a unit having individual sounds:
vehicletype {
   ...
   MovementSound = someFile.wav
   KillSound = scream.wav
   Weapons {
      Weapon0 {
         Sound = shoot.wav
         ...
      } weapon0
      ...
   } Weapons
} vehicletype
Generic Sounds
It is possible to have define the sounds for whole groups of units. This is done in the file sounds.asctxt
A simple example is:
shoot.cruisemissile.files = weapon00.wav
This causes the file weapon00.wav to be played when a cruise missile is fired.
It is possible to define more than one sound file:
shoot.cannon.files = weapon07.wav weapon07b.wav
shoot.cannon.labels = default very_big_cannon
If a cannon is fired, weapon07.wav will be played. But some units may specify that their cannon should play weapon07b.wav . This is done by adding Sound = very_big_cannon to the weapon definition. The Sound is the same entry as the one where a filename for an individual sound is specified. The distinction between fileName and soundLabels is done by looking for a dot (.) in the entry. If there is a dot, the entry is treated as filename; if there is no dot, it's a label.
These alternative sounds can also be specified for unit movement ( MovementSound = sound_label in vehicletype ) and the kill sounds ( KillSound = sound_label in vehicletype ).
Since ASC 2.0 it is possible to have a special beginning sound, which is useful for unit movement:
move.light_aircraft.files = enginestart.wav:move_jet.wav
First the enginestart.wav will be played, once this is finished the sound move_jet.wav will be played and looped until the unit movement is finished.
Also new in ASC 2.0 is the usage of height specific sounds. The level of height on which the unit started its movement will be used for the whole movement operation. Just use these names as labels for unit sounds: "deep_submerged", "submerged", "floating", "ground_level", "low_level_flight", "medium_level_flight", "high_level_flight", "orbit" .
Sound Formats
In ASC2 the sound files can be in many different formats, with WAV, MP3, OGG and FLAC being the most common ones. The usage of OGG is strongly recommended, as it is as space efficient as MP3, but works on all systems, which MP3 does not (some Linux distributions don't come with an MP3 decoder by default to avoid its license fees).
Last change: Mon, 2006-08-14 5:38
To change the music that ASC plays, place a file music1.asctxt in your primary ASC directory and specifiy the files there. ASC can play MP3, OGG, Midi and various tracker formats like MOD, S3M and others.
The default file looks like this:
playlist {
   Name = Not used at the moment
   tracks = music/*.mp3
} playlist
If you also want to play MOD files for example (located in the music directory), change the file into
playlist {
   Name = Not used at the moment
   tracks = music/*.mp3 music/*.mod
} playlist
ASC uses the SMPEG library for playing MP3 files, which apparently can not decode MP3 files with variable bitrate.
Last change: Thu, 2003-05-08 12:56
The term 'container' refers to both buildings and units and will be used throughout this article, which both behave absolutely identical. The term 'unit' always refers to the unit that is going to be transfered into or out of a container.
This is an example of the Transportation Variables:
   Transportation {
      MaxLoadableUnits = 32
      MaxLoadableUnitSize = 200
      MaxLoadableMass = 1000000
      CategoriesNOT = light_aircraft medium_aircraft
      EntranceSystemNum = 2
      EntranceSystem0 {
        Mode = In Out Docking
        UnitHeightAbs = ground_level
        UnitHeightRel = -100
        ContainerHeight = ground_level
        CategoriesNOT =
        DockingHeightAbs = ground_level
        DockingHeightRel = -100
      } EntranceSystem0
      EntranceSystem1 {
        Mode = Out
        ContatinerHeight = low_level_flight
        UnitHeightAbs = ground_level
        RequireUnitFunction = paratrooper
        CategoriesNOT =
        DisableAttack = true
        MoveCost = 12
      } EntranceSystem1
   } Transportation
If there is no transportation group, the container can not carry any units.
- MaxLoableUnits
- The maximum number of units that can be carried. There is an exception to this rule: if a building is already full, it can still be conquered by an enemy unit. Default: 0
- MaxLoadableUnitSize
- The maximum size (=empty weight) of a single unit. Default: 2^31 (which is very very much, about 2 billion)
- MaxLoadableMass
- The maximum weight of all units. Default: 2^31
- CategoriesNOT
- These Categories can NOT be loaded. Default: none (that is, all can be loaded)
- EntranceSystemNum
- A Container may have any number of entrance systems. If it does have none, no units can enter or leave the container on their own. But it is still possible to load units if the container is inside another container. Default: 0
- Mode
- May be any combination of In, Out and Docking. Docking means transfering a unit from one container to another if both are standing next to each other. Example: A trooper loaded in a submerged submarine may conquer a submarine base, although the trooper can not leave the submarine to dive a bit on his own.
- ContatinerHeight
- The entrance system can only be used if the unit/building is a level of height specified here
- CategoriesNOT
- These Categories can NOT be loaded. Default: none (that is, all can be loaded)
- UnitHeightAbs
- The unit must be on one of these levels of height for the entrance system to work. If UnitHeightAbs is 0 , this variable will NOT restrict anything.
- UnitHeightRel
- The unit must have a level of height that differs by UnitHeightRel to the height of the container. This is only necessary for containers that can operate at different altitudes. A good example is the space shuttle: if it is in orbit, it may (un)load orbiting satellites, but no satellites that are on the ground. If is the shuttle is on the ground, it may (un)load satellites that are on the ground, but not in orbit. So you would specify UnitHeightRel = 0 for the space shuttle. If the unit must be one level higher than the container, you would use UnitHeightRel = 1. Please note that ground_level and floating are treated as ONE level of height, so a floating aircraft carrier ahs a height difference of 0 to a walking trooper, and a height difference of 1 to a aircraft on low level flight.
If the container cannot change its level of height, specifying UnitHeightRel is absolutely unnecessary, because UnitHeightAbs does the same and is much easier to read and understand!
If UnitHeightRel = -100 this variable will NOT restrict anything. Default: -100 - dockingHeight_abs
- For a unit to move from one container to another the dockingHeight_abs of the container must match. Default: 0
- dockingHeight_rel
- Comparable to UnitHeightRel. Default: -100
- RequireUnitFunction
- The EntranceSystem is restricted to units having the given functions. If nothing is specified this variable will not restrict anything. Default: Nothing
- DisableAttack
- If true, a unit can't attack any more after having used this entrance system. Default: false
- MoveCost
- This value overrides the movement cost for using the entrance system. It is currently only evaluated for moving OUT of a container. Values < 10 must not be used. A value of -1 indicates that no override is taking place. Default: -1
Last change: Thu, 2004-10-28 12:50
Diese AI-Parameter sind noch nicht so 100% ausgereift. Das sind die Variablen, mit denen die KI intern die Einheiten verwaltet. In welchem Maße die KI auf manuelle Vorgaben dieser Werte reagiert muss ich selbst noch ausprobieren.... Da können also möglicherweise noch Bugs sein. Aber in dem Maße, in dem die Campaign Fortschritte macht, werde ich diesen Bereich auch testen, auftretende Fehler beheben und evt. ein paar Funktionen erweitern.
Task sind kurzfristige Aufgaben, Jobs sind Lebensaufgaben. Wenn die KI einen Panzer auf mit einem Algol auftanken will und dafür mit dem Algol 3 Felder zum Panzer fahren muss, dann ist "Supply" der Job und "move" der Task.
Move ist eigentlich der einzige sinnvolle Task, den man im Karteneditor vorgeben kann. Zielkoordinaten werden für task move ausgewertet. X/Y ist klar, Z ist die Höhe ( 0 .. 7 ), NWID ist die interne Einheitenidentifikation. Damit kann man erreichen, dass die eine Einheit immer in Richtung einer anderen Einheit fährt, auch wenn letztere sich bewegt. Die NWID lässt sich im Karteneditor bei Info/TerrainInformation unter "Vehicle Information / Internal Identification" anzeigen.
Jobs: Build wird noch nicht benutzt Recon: Die Einheit wird ausschließlich zum Spähen / Stören eingesetzt Guard: Bewachen. Ob das jetzt schon funktioniert weiß ich nicht, ich werde es aber demnächst zum laufen bringen, weil für die Campaign benötigt. Details dann.
Value / Added Value. Jede Einheit wird von der KI hinsichtlich ihrer Gefährlichkeit bewertet. Mit Value kann man diese Bewertung überschreiben. Eigentlich nie notwendig. AddedValue schon eher: Stell Dir vor, in einer Mission gehts darum, den Oberkommandieren in einem Auto spazierenzufahren. Die Einheit darf nicht abgeschossen werden. Wird nun bei Added Value bei dieser ein hoher Werte eingetragen , wird nun aber die KI versuchen, genau diese Einheit anzugreifen. In ASC kann man mit F8 die KI-Informationen anzeigen lassen (eine Funktion, die für die Allgemeinheit eher uninteressant ist, deshalb undokumentiert). Dort kann man den Value sehen. Added-Value sollte mit dieser Größenordnung korrespondieren.
Die KI Parameter beziehen sich immer auf einen Spieler. Falls auf einer Karte mehrere KI-Spieler sind arbeiten die vollkommen unabhängig voneinander. Falls nur eine KI auf der Karte ist und die blau ist, müssen die AI-Parameter für Spieler 1 ( = blau) eingestellt werden. Im Beispiel mit dem Oberkommandieren: Wenn der in einem roten Auto sitzt, aber von der blauen KI angegriffen werden soll, muss auch hier der AddedValue bei den Ai-Parametern für Spieler 1 stehen.
So, ich hoffe mal, einen ersten Überblick vermitteln zu können...
Last change: Sun, 2003-02-09 15:12
The mapeditor has the abilitiy to run map transformations. These can be used to exchange objects and terrain. Map transformation tables have the syntax of normal .ASCTXT files, but have a different name: .ASCMAPXLAT . All .ASCTXT files are loaded at program start so it is not possible to alter the data while the program is running. But the map transformation files are reloaded each time you run a transformation.
The syntax of a map transformation file is:
maptranslation {    TerrainTranslation = [ 1 5
                           2 116 ]    ; This causes all terrain files with TerrainType ID 1 to be replaced by TerrainType 5
    ; and all fields of TerrainType ID 2 by TerrainType 116

    TerrainObjTranslation = [ 10 100 101
                              11 234 102 ]    ; This is a special translation for the fields that must be translated to
    ; a terrain AND an additional object. First number is Terrain ID to be replaced,
    ; second number is ID of new terrain, third number is ID of object that is added to field
    ObjectTranslation =  [ 181 81 ]

    ; This transforms one object into another, in this example object 181 into object 81    BuildingTranslation =  [ 51 21 ]

    ; This transforms one building into another.
    ; The building entry is moved up to one field into each direction to enable a placement of the building    VehicleTranslation =  [ 51 21 ]

    ; This transforms one Vehicle into another.
    ; (available since ASC2)
    Object2ObjTerrainTranslation = [ 130 1030 20 ]
    ; will replace object 130 into 1030 and also change the terrain on those fields
    ; to 20
    ; available since ASC 2.4.82.0     TechAdapterTranslation = [ Foo Bar ]
    ; if any player has activated the TechAdapter Foo (roughly equivalent to having
    ; researched a Technology), this will be replaced by Bar
    ; available since ASC 2.4.90.1

} maptranslation
Last change: Sat, 2011-02-05 10:36
ASC verwendet die Palette. die im Bild ascpalette.gif dargestellt ist. Wie mat sieht, existieren dort zwei rote Farbverläufe sowie noch ein weiterer, einzelner Rotton. Für die Eigentümer-Markierung der Gebäude werden die Farben des ersten Farbverlaufs entsprechend verschoben, also durch die Farben des blauen verlaufs für den zweiten Spieler, dem gelben Verlauf für den 3. Spieler usw. ersetzt. Die Spielermarkierung muß ausschließlich diese Farben des ersten rot-Verlaufs verwenden.
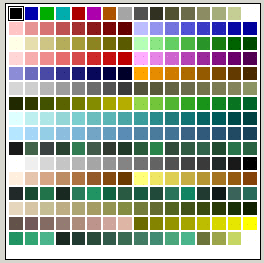
Wenn mat nun ein Truecolor-Gebäude hat und das auf diese Palette konvertierst, schert sich das Bildbearbeitungsprogramm einen Dreck darum, von welcher Position es jetzt die Rottöne nimmt. Es nimmt ein paar aus dem ersten Verlauf, ein paar aus dem zweiten Verlauf, mit dem Ergebnis, daß beim blauen Spieler immer noch rote Pixel drin sind (nämlich die, die eine Farbe aus dem zweiten Rotverlauf haben).
Um nun ein Gebäude erfolgreich so zu konvertieren, daß es mit den Rottönen passt, muß man die Palette modifizieren, wie im Bild asc-building-palette.gif dargestellt. Alle Rottöne außer dem ersten Verlauf wurden eliminiert. Jetzt bleibt dem Bildbearbeitungsprogramm nichts anderes übrig, als diese und nur diese Rottöne zu verwenden.
Die beiden GIF-Bilder dienen ausschließlich der Demonstration, welche Palette die im detail enthalten weiß ich nicht, auf jeden Fall nicht die ASC-Palette (sind schließlich Screenshots). Hier ist auch noch ein Gebäude, das nun diese modifizierte Palette auch tatsächlich verwendet.
ASC ist es folkommen egal, welche Palette jetzt genau in der PCX-Datei vorhanden ist. Es nimmt bei 8-Bit Bilder prinzipiell seine eigene an, es ist also kein Problem, PCX-Bilder mit der modifizierten Palette einzubinden.
Last change: Sat, 2003-02-01 9:20
Border
Für Objekttypen gibt es einen neuen Eintrag namens "NetBehaviour". Dieser kann keine, eine oder mehrerer der folgenden Schlüsselworte beinhalten:
- NetToBuilding
- NetToBuildingEntry
- NetToSelf
- NetToBorder
- SpecialBiForest
- AutoBorder
Bedeutung sollte bei den meisten Fällen klar sein. AutoBorder ist z.B. für Straßen und Schienen, die in möglichst grader Linie in den Kartenrand laufen sollen. NetToBorder ist für Wald, der sich flächig mit dem Rand verbinden soll.
Der alte Eintrag "NoSelfChaining" wird zwar nachwievor ausgewertet, wenn er vorhanden ist. Aber beim Neuerstellen oder editieren existierender Objekte sollte wenn möglich auf das neue System umgestellt werden..
Nets of objects
Some objects like roads or pipelines connect automatically to each other to form a net instead of staying as independent graphics. Such an object must have 64 different graphics. If it is symetrically the number can be reduced by flipping the picture to 24 different images.But the object must contain all 64 images. The position of each is determined by the sides that connect to another object. Each side has a number:


Last change: Sat, 2004-05-29 15:03
Items like VehicleTypes, ObjectTypes, BuildingTypes and TerrainTypes can be selected through lists in the mapeditor. To make selection easier, you can restrict the displaying of these items through filters, for example to display only VehicleTypes that belong to a certain UnitSet.
These filters are defined by .ASCTXT files and have the following form:
itemfilter {
   Vehicles = 0 1 2 3 4
   Buildings = 0-4
   Objects = 2000-4999 5000-5005
   Terrain =
   name = This is the name of the filter
   activated = true
} itemfilter
An activated filter will inhibit the selectability of the items it covers. The activated variable specifies the status of the filter after the editor has been started.
Last change: Sat, 2003-02-01 8:46
The following template can be used for designing buildings:

(URL: http://www.asc-hq.org/kb/building-coordinates.png)
This is the maximum size that a building can have in ASC.
The coordinates of the fields have to be entered in the building definition file.
If the building is constructed in several stages, you have to specify one image for each construction stage. These images have to be in the same file, but at different coordinates. The first image is at coordinates x=0/y=0 (just like above image), the second image starts at x=500/y=0 ; the third one at x=1000/y=0 and so on.
If a building is destroyed, it can leave rubble objects behind. This is done by adding:
RubbleObjects = true
Rubble {
  A1 = 123
  A2 = 234
  [...]
}
to the building definition file. For each field of the building specify its coordinate and the ID of the object that will appear when the building is destroyed. These objects are just ordinary objects.
Last change: Thu, 2010-06-03 20:43
Many of the data ASC uses is stored in .ASCTXT files. These are simple text files which you edit with any decent text editor. Since some of the existing files may have unix line ending convention, the standard Windows editor Notepad is not a good choice (you can try it, but if you see garbage you know what's wrong...). UltraEdit is a nice editor, but it is shareware.
Related links:
- decompressing the ASC container files (required for accessing the existing .ASCTXT files)
- The semantics of ASCTXT files
- Tag names
All ASCTXT have the following syntax:
TypeName {
   ...
} TypeName
Typename is for example VehicleType, BuildingType, ObjectType or others.
In the TypeName block can be assignments and comments:
VehicleType {
   name = trooper
   ; this is a comment
} VechicleType
An Assignment can cover more than one line, this is useful for long texts:
VehicleType {
   description = [  This is a long description.
                    It covers several lines,
                    and ends with a square bracket ]
} VechicleType
The assignments are often grouped in blocks:
VehicleType {
   Tank {
      Energy = 0
      Material = 0
      fuel = 1610
   } Tank
} VechicleType
You could also write:
VehicleType {
   Tank.Energy = 0
   Tank.Material = 0
   Tank.fuel = 1610
} VechicleType
which is exactly the same, but the first variant is usually easier to read.
Last change: Wed, 2003-04-02 11:41
The following terrain properties are sorted by their carrying capacity:
- water
- swamp
- morass
- mud
- lowland
- road
If a terrain should be inaccessible to all units (except airplanes), just don't set any bit.
Last change: Wed, 2003-04-02 11:52
For a introduction to resource management, see Article 22
BI Resource Mode
The amount of resources that is produced every turn has to be set in the map editor when designing the map and is not affected by anything else. Any building can produce any amount of resources. The maximum storage capacity is defined in the building type file and should usually be extremely high, to be practically infinite.
ASC Resource Mode
The ASC Resource Mode is much more complex. There is no global pool for any resource. Every transfer between buildings has to be done with pipelines.
There are several different building functions that are resource related, which are defined for the building type:
- solar power plants
- wind power plants
- mining stations
- matter converter (was formerly called: 'conventional power plant')
It is not possible to combine several of these functions in one building type.
Solar power plants produce resources without consuming any other, usually (but not necessarily) energy. The amount of produced resources is the maxplus setting of the building multiplied with a factor for the weather. This factor is 100% for clear weather, 50% for rain, 25% for heavy rain, 75% for snow and 37.5% for much snow.
Wind power plants produce resources without consuming any other, usually (but not necessarily) energy. The amount of produced resources is the maxplus setting of the building multiplied with the power of the wind. At the max wind power of 255 it produces 100% of energy.
Mining stations extract resources from the ground around their entrance, field-by-field. Since only material and fuel can be stored in the ground only these can be extracted. With increasing distance from the entrance the amount of extracted resources per turn gets less and less. The bars on the left side of the mineral resources page in the buildings window shows this. The maximum distance to extract resources from is 10 fields.
Mining stations sometimes consume other resources in order to operate. The resources they consume is set in the mapeditor in the plus field as negative values. If this resource is unavailable, the station cannot fulfill its task. If the resource is available, but you want to conserve it, you can adjust resource consumption in the mining dialog. Of course, setting lower rate of consumption results in reduced output.
The efficiency ( = resources_stored * 1024 / extracted_resources ) is specified there also. The higher the efficiency, the less resources are extracted from the ground to produce a given output. Default value for effeciency should be 1024. You can find some additional notes about mining stations at the end of this text.
Matter converters use one kind of resources to produce another. You can build quite a variety of different converters. Power plants consume fuel to produce energy, a fusion power plant could use material for this. A refinery could convert material to fuel. It is also possible to produce two resources out of one, or vice versa cosume two resources to produce one.
Like mining stations the resources that are beeing produced are defined by using positive values in the various plus fields, while resources that are consumed are identified by negative values. The maxplus field of the building type defines the upper limits. In the mapeditor the limits for the buildings may be decreased by settings the maxplus fields there. The plus field defines the initial production rate which can be changed in the game on the appropriate page of the building window.
Notes on mining
The relative amount of resources that is still in the ground is displayed in the right graph of the "mineral resources" page in the mining station. If every field of the ring that has a given distance contains the maximum possible resources, the bars have maximum height. Since there are more fields at a far distance, the absolute amount of resources in the greater distances is usually much greater. This is indicated by the single lines which display the absolute amount of resources. Note that the bars and the lines are differently scaled.
You can search mineral resources with some units, the radius for the search is specified in the vehicle type. There are two functions a unit can have: "drill for mineral resources manually" and "search for mineral resources automatically".
The mining stations can see the mineral resources to and at their current mining position too.
In the mapeditor the pull-down menu Global / Toggle Resource View toggles the way in which resources are displayed on the map:
- not at all
- as bars (upper bar is material , lower bar fuel)
- as numbers (upper number is material , lower number fuel)
ASC internals
The following variables exist to describe the resource system. Unless otherwise noted they all contain fields for each of the three resources: energy, material and fuel.Building type(defined in .asctxt file)
:
- ASC tank: the maximum storage capacity in ASC mode
- BI tank: the maximum storage capacity in BI mode
- maxplus: see above explanation
- efficiency material: only for mining stations, see above explanation
- efficiency fuel: only for mining stations, see above explanation
Building instance (set by mapeditor):
- plus: only used in ASC mode
- maxplus: only used in ASC mode
- current storage
- BI plus: only used in BI mode
Each field on the map:
- material
- fuel
- resources visible: the amount of resources that is displayed is not necessarily the amount of resources in the ground, it is the amount that was there when you checked the field the last time.
The map itself
- energy and fuel for each player in BI resource mode
Last change: Mon, 2003-01-27 14:04
Die Karten der Campaign sollen zusammenhängend sein. Dies sei am Beispiel Karte2 + 3 beschrieben: In Karte zwei erobert man ein Hauptquartier am rechten Rand der Karte mit einigen Gebäuden drumherum. In Level 3 ist genau dieses HQ mit den gleichen Gebäuden, Objekten und Bodentypen am linken Rand wiederzufinden. Dies erreicht man am einfachsten dadurch, dass man sich die vorherige Karte in den Editor einläd, diese mit "Resize Map" entsprechend abschneidet und am anderen Ende erweitert.
Es gibt bis auf weiteres nur zwei Parteien: Der menschliche Spieler Rot sowie der Gegner Blau. Das Spiel sollte schließlich Amerikaner-Kompatibel sein: Es gibt nur Gut und Böse. Und der Spieler ist natürlich per Definitionem der Gute.
Die Hauptvorstoßrichtung ist am Anfang von Westen nach Osten. Natürlich kann davon in Grenzen abgewichen werden, mal einen Abstecher nach Süden oder so; aber eine Umkehrung der Vorstoßrichtung sollte gut begründet werden können. Natürlich kann sich diese Vorstoßrichtung im Laufe der Campaign ändern, insbesondere wenn man auf einer anderen Insel / Kontinent gelandet ist. Aber wichtig ist, dass der Spieler ein Gefühl für einen "Vorstoß" erhält und die Karten nicht kreuz und quer gehen.
Für die Wahrung eines einheitlichen Aussehens bitte für Grafik und Objekte soweit möglich die ASC2 Grafik nutzen, nicht die Grafiken aus der ASC.GFX. Letztere lassen sich durch Anwählen des "GFX graphic system" Filters ausblenden.
Die Entwicklung einer neuen Campaign-Karte sollte, solange ich die Planung mache, in mehreren Schritten erfolgen, nach denen eine Rückmeldung mit den anderen an der Campaign-Entwicklung beteiligten Personen stattfindet:
Der jeweils aktuelle Stand der Karten ist HIER verzeichnet:
Beim Erstellen neuer Karten bitte darauf achten, dass die aktuelle Version der vorhergehenden Karte als Anschluß-Karte genutzt wird!
Einzelne ASC-Funktionen und Elemente werden der Reihe nach in der Campaign eingeführt und anschließend verwendet. Jede Karte sollte irgendetwas neues gegenüber den vorhergehenden Karten bieten.
Noch nicht verwendete Features:
- Flugzeuge
- Bauen von Gebäuden (Kraftwerke, Bergwerke)
- Suchen von Resourcen
- Uboote
- Schatzsuche (versunkenes Wrack suchen und erobern)
- Eisbrecher
- Wetteränderungen: Zufrieren von Gewässern
- Wind
- Paratrooper
- Raumfahrt
- Bauen von Geschützstellungen
- Züge
- Angriff auf Fabriken und Pipelines zum Unterbinden gegnerischen Produktion
Zur Generierung von Namen, z.B. für Missions-Briefings oder Gebäude, kann der Fantasy Name Generator verwendet werden.
Last change: Sun, 2003-06-22 16:39
Zur Veränderung der Werte Attackbonus, Defensebonus und Jamming gibt je zwei Variablen: *_abs und *_plus.
*_abs ersetzen den borhanden Wert, *_plus modifizeren ihn. Wenn *_plus verwendet wird muss *_abs = -1 sein.
Alle Werte werden zum Nenner 8 angegeben. Ein Defensebonus von 8 hat also die gleiche Wirkung wie eine Verdoppelung der Panzerung.
Bei *_plus sind negative uneingeschränkt möglich.
Jamming_abs darf (abgesehen vom Sonderfall -1) keine negativen Werte annehmen, was auch keinen Sinn machen würde.
Bei Attack/DefenseBonus sind negative Werte erlaubt, wobei -1 der bereits erwähnte Sonderfall ist. Sinnvolle negative Werte sind also -2 bis -7 . Kleinere Werte als -7 sind nicht erlaubt und machen auch keinen Sinn, da dadurch die Angriffs- bzw. Verteidigungswerte <= 0 würden.
Ein DefenseBonus von -6 hat die Gleichung Wirkung wie eine Reduzierung der Panzerung um 75%.
Last change: Sun, 2003-01-26 8:30
The ASC data containers (*.CON) are compressed archives which can be decompressed with a tool that comes with ASC. The Windows-Version is called DEMOUNT.EXE and is part of the editor package, the unix version is called asc_demount and is compiled and installed together with ASC itself.
If you are familiar working on the command line, you just need to know that when you run demount datafile.con it extracts all files to the current directory.
For Windows users who are not familiar with working on the command line, here's are the steps to extract a data file:
- create a new directory where the extracted files are going to be placed. In this example I'll use D:\ASC\DATA-FILES
- open a command prompt (sometimes called DOS prompt)
- type D: and hit enter to change your drive to D:
- type cd "asc\data-files" to enter the directory we just created (the quotation marks are used because the directory may have spaces in its name)
- open the Windows Explorer and locate the directory where you installed the ASC editor package. In a subdirectory called tools there is the file demount.exe
- use the mouse to drag this file into your command window
- enter a space in the command window
- now find the ASC data container that you want to extract and drag it into the command window too
- now hit enter in the command window.
- that was it. Now all files contained in the data container have been extracted to D:\ASC\ASC-FILES
If you get an error message that a DLL file (for example SDL.DLL) could not be found, you can either:
- copy these DLLs from the ASC directory to the directory you are working in
- add your ASC-directory to the Path ( with Windows2000 this is done in ControlPanel / System / EnvironmentVariables )
Last change: Thu, 2003-07-24 3:55